A while back, I had a few spare components and modules lying around and amazingly, some spare time. So, what does a tinkerer do? Build something useful.
I decided to build a GPS tracking unit for my vehicle. The completed project, however, could quite easily be modified to track almost anything.
Parts list
Table 1 shows the list of major components/modules that were used in this project.
The reason a Particle Photon was used was because a few had been left over from previous projects. However, a better choice would probably be a SoC, with embedded 3G/4G communications instead of Wi-Fi like the excellent Particle Boron. This SoC communicates directly with a cellular service and has a battery charging circuit on board for easy integration into a tracking device.
The Particle devices (www.particle.io) are not just a microcontroller with embedded communications module. They are a complete ecosystem with a web-based management and data logging system integrated. This is extremely useful as it provides valuable fault-finding features and allows for over-the-air updates of both program code and module firmware.
The Particle free plan allows for 100 000 data operations per month. This will allow a data operation every 30 seconds for a complete month, which is perfect for GPS tracking applications.
Fortuitously, an old 3G modem had previously been installed into the vehicle permanently, to use as a mobile hotspot when travelling, so this was used as the source of Wi-Fi.
The GPS model chosen was the EM406, but any GPS module with NMEA serial output could be used in its place.
The integration of the battery was chosen so that the unit could be tracked even if the vehicle’s supply was disconnected. On testing, the 2000 mAh battery lasted around six hours before running flat.

The build
The circuit connection is very simple. The battery was connected to the battery charging circuit via the integrated connector and the 5 V DC output was then connected to the input of the Particle Photon. The serial port on the Photon was then connected to the Tx and Rx lines of the GPS module using a crossover connection.
The code
The online Particle code editor was used to edit and debug the code required for the tracker. The editor also provided a convenient method to provide OTA updates to the SoC.
First, required libraries were imported and various declarations were made. Only two libraries were needed: TinyGPS++.h was used to communicate with the GPS module and Blynk.h was used to communicate with the Blynk Android app. An authorisation number was embedded in the code, to allow for communication with the Blynk app.
In the setup routine, communication for the serial module and the Blynk module were initiated, and two timers were started to allow transmission of GPS data at specific intervals. A generic baud rate of 4800 bps was chosen for communication with the GPS module.

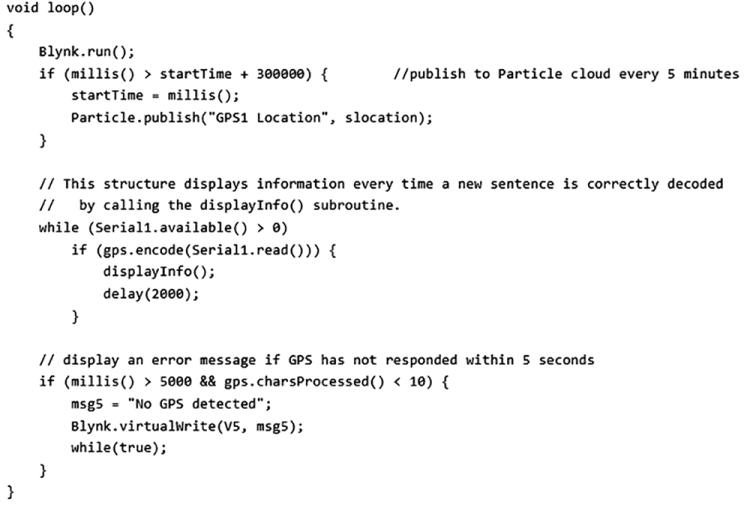
In the main routine, a timer routine was used to publish location data to the Particle cloud every 5 minutes. A routine called displayInfo() was called every time a new sentence sent by the GPS module was correctly decoded. If no GPS message was received within 5 seconds, an error message was displayed to that effect.

The displayInfo() routine used the TinyGPS++ library to calculate various GPS parameters based on the received NMEA string. Values calculated and display included speed in km/h, cardinal direction, the number of satellites visible, and the horizontal accuracy. This information was all sent to the Blynk app using virtual tag numbers V1 to V5, the latter being used for the status message.
Blynk app
The final task was to create a new project in the Blynk app available on either an Android- or iOS-based phone. A new project named ‘GPS-Track’ was created and the Particle Photon was selected as the communication device. The main component (widget) on the Blynk interface was the map widget. This was created with a connection to virtual pin V0. The other labels V1 to V4 were then arranged in a grid pattern at the top of the GUI with V5 (status message) occupying the area underneath the map. The final working interface is shown in figure 5.

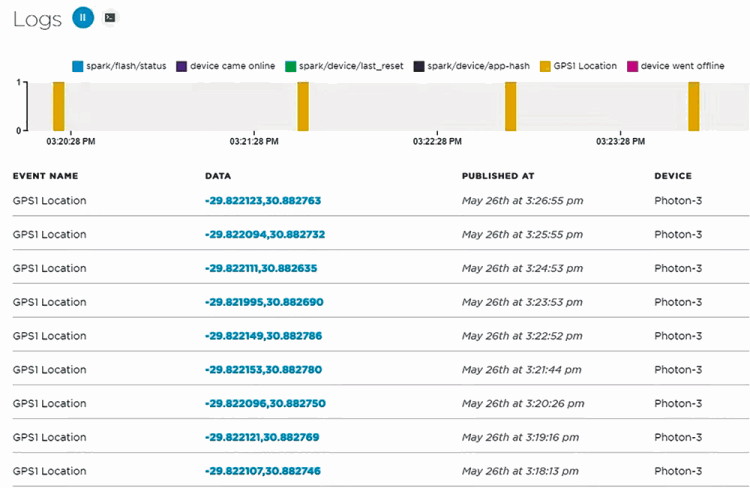
Figure 6 shows the logs displayed in the particle.io logging interface. Here the location data, date and time of publication and event name is displayed in a table. This data can easily be imported into a spreadsheet for analysis of historical position data.

The final system allowed for an accuracy of 8 m outdoors. This was likely due to the older GPS module being used and could be improved using one of the latest multi-constellation GPS modules available.

© Technews Publishing (Pty) Ltd | All Rights Reserved